
Introduction: Why a Leaking Tap Shouldn’t Be Ignored
A dripping faucet may seem like a minor household issue, but over time it can result in significant water waste, increased utility bills, and even long-term damage to your plumbing fixtures. Whether it’s the constant dripping sound or the slow rise in your water bill, leaking tap repair is something every homeowner will likely need to address at some point.
By understanding what causes tap leaks and how to repair them effectively, you can save money and conserve water with just a few tools and some basic knowledge.
Common Causes of a Leaking Tap
Understanding the reasons behind a tap leak is the first step in addressing the issue effectively.
1. Worn-Out Washers or Seals
The most common reason for a leaking tap is a degraded washer or O-ring. These rubber or silicone components can wear out due to friction and time, leading to water seepage even when the tap is fully closed.
2. Corroded Valve Seat
The valve seat connects the tap to the spout. Over time, minerals in the water can corrode this connection, causing the tap to drip even when turned off.
3. Loose Parts
Parts like the packing nut or adjusting ring can loosen over time, allowing water to escape.
4. High Water Pressure
If your home has unusually high water pressure, it may cause water to leak from taps, especially if the internal components are aging or compromised.
Tools You’ll Need for Leaking Tap Repair
Before diving into the repair process, gather the right tools:
- Adjustable spanner or wrench
- Flathead and Phillips screwdrivers
- Replacement washers or O-rings
- Plumber’s tape
- Cleaning cloth
- Bucket or towel to catch water
Step-by-Step Guide to Repairing a Leaking Tap
Step 1: Turn Off the Water Supply
Locate the shut-off valve under the sink and turn it off. Open the tap to release any remaining water in the pipes.
Step 2: Plug the Drain
To avoid losing any small components, plug the drain using a rubber stopper or cloth.
Step 3: Remove the Tap Handle
Use a screwdriver to remove the decorative cap and unscrew the handle. Gently lift it off to expose the valve mechanism underneath.
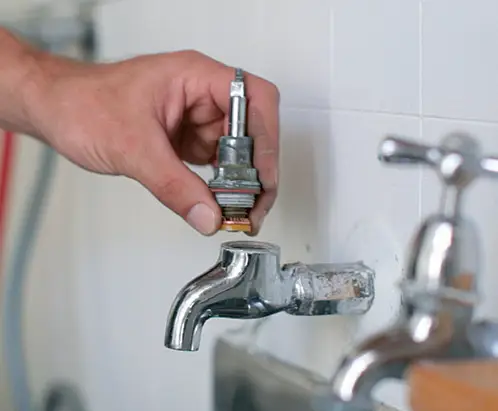
Step 4: Loosen the Bonnet Nut and Remove the Stem
Using a spanner, unscrew the bonnet nut and pull out the tap stem. Be careful not to damage the threading.
Step 5: Inspect and Replace the Washer
Check the rubber washer at the base of the stem. If it’s worn out or cracked, replace it with a new one of the same size.
Step 6: Reassemble the Tap
Reinstall the stem, bonnet nut, and handle in reverse order. Turn on the water supply and test the tap for any remaining leaks.
Different Types of Taps and How to Fix Them
1. Compression Taps
These taps work by tightening a washer against the valve seat. Replacing the washer usually resolves the leak.
2. Ceramic Disc Taps
These use two ceramic discs that move against each other. If they’re leaking, the discs or the seals might need replacing.
3. Ball Taps
Common in kitchens, ball taps have multiple parts. Replacing the entire ball valve kit is often the best solution.
4. Cartridge Taps
These feature a replaceable cartridge that controls water flow. If your cartridge tap leaks, replacing the cartridge is usually straightforward.
Preventive Maintenance Tips for Long-Term Fixes
Proper maintenance can extend the life of your plumbing fixtures and help prevent future leaks.
1. Use Taps Gently
Turning taps off too forcefully can wear down washers and seals more quickly.
2. Install Aerators
Aerators reduce water pressure, lowering the strain on internal tap components.
3. Check for Leaks Regularly
Make a habit of inspecting your faucets and pipes for early signs of wear or drips.
4. Soften Hard Water
Installing a water softener can reduce mineral buildup, helping prevent corrosion in valve seats and other internal components.
Environmental and Financial Impacts of Leaky Taps
Many homeowners underestimate the cost of ignoring a leaking tap. Here’s why it matters:
- Water Waste: A single leaking tap can waste up to 20,000 liters of water annually.
- Higher Water Bills: Even a small drip can lead to noticeable increases in your monthly utility expenses.
- Mold and Mildew: Excess moisture from slow leaks can create a perfect environment for mold growth.
- Structural Damage: Over time, leaking water can damage cabinetry, walls, or floors near your plumbing.
FAQs
How do I know if my tap washer needs replacing?
If the tap continues to drip even when fully turned off, it’s likely that the washer is worn or cracked and needs to be replaced.
Can I use any washer for a leaking tap repair?
No, you need to use the correct size and type of washer designed for your specific tap model. Mismatched washers may not seal properly.
Is it better to repair or replace a leaking tap?
If the tap is relatively new and in good condition, repair is usually sufficient. However, for older taps with frequent issues, replacement might be more cost-effective.
How long does a leaking tap repair take?
With the right tools, repairing a leaking tap typically takes 30–60 minutes, depending on the type of tap and the extent of the wear.
What if the tap still leaks after replacing the washer?
If replacing the washer doesn’t stop the leak, the issue could be with the valve seat, stem, or other internal parts that may also need attention.
Conclusion
Timely leaking tap repair is more than just a household chore—it’s an essential part of responsible home maintenance. By understanding the causes, using the correct tools, and following proper repair techniques, you can tackle most tap leaks on your own and avoid unnecessary water waste and costs.
Invest a little time in fixing that drip now, and you’ll be rewarded with peace of mind, lower utility bills, and a more efficient plumbing system.